Remove Unwanted Audio Tracks from Video Files

AVI Files

AVI Files

It is now possible to have multiple audio tracks in a single video. This is becoming common for Movies and Documentaries. This way a single video is good for serving people of different lingual backgrounds. However, like me you might not be interested in all those tracks. In this tutorial, we will remove all the unwanted tracks.

The tool we will be using is avconv and in a previous post I have mentioned how to install it in Ubuntu, so I will not be going into the installation part again.

Check how many Tracks are there

First of all we need to check on the track details and for that, run the following command (the extension can be mp4, mov, mkv, avi or any other):

avconv -i file_name.mkv

In my case, I got the following output:

avconv version 0.8.6-6:0.8.6-1ubuntu2, Copyright (c) 2000-2013 the Libav developers
  built on Mar 30 2013 22:20:06 with gcc 4.7.2
[matroska,webm @ 0xc31d40] Estimating duration from bitrate, this may be inaccurate
Input #0, matroska,webm, from 'file_name.mkv':
  Duration: 00:46:15.28, start: 0.000000, bitrate: 768 kb/s
    Stream #0.0(eng): Video: h264 (High), yuv420p, 1280x720, PAR 1:1 DAR 16:9, 25 fps, 25 tbr, 1k tbn, 50 tbc (default)
    Stream #0.1(rus): Audio: ac3, 48000 Hz, 5.1, s16, 384 kb/s (default)
    Stream #0.2(eng): Audio: ac3, 48000 Hz, 5.1, s16, 384 kb/s
At least one output file must be specified

The lines in bold tell us how many tracks are there.

Removing the track

Since I have no interest in Russia audio, I would like to remove it. In my case I would like to keep the second track. Here is the command:

avconv -i file_name.mkv -map 0:0 -map 0:2 -acodec copy -vcodec copy output.mkv

If your track is different, for instance you want to keep the first track, replace -map 0:2 with -map 0:1 and it will work.

Another advantage you will get is a reduction in file size, which is always a good news. 🙂
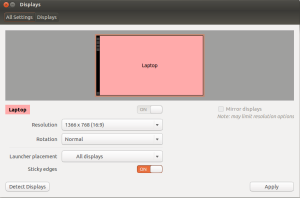
Change Display/Screen Resolution using Linux Command

Display Application in Ubuntu

Display Application in Ubuntu

To change the Screen Resolution in Ubuntu, simply type Display in the Unity Launcher and run the application. The snapshot of the Display application is taken from Ubuntu 12.10 and is also the same in previous versions also. Similar application is available in other Linux distributions.

But there is a handy command that can do the same thing even faster or can help you create a script (depends how creative and productive you plan to be). The command is simple:

xrandr

This will display all the possible resolution profiles available for the current system (more can also be added and you can find help on http://www.x.org/archive/X11R7.5/doc/man/man1/xrandr.1.html).

To change to a known resolution:

xrandr -s 1024x768

And you have it! 🙂

Rotate & Flip Video Files in Ubuntu (Linux)

Rotate Video Files

Rotate Video Files

The first thing that might pop-up in the reader’s mind is that why would anyone ever want to rotate a video? Well this need arose when I recorded videos using iPad (which always auto rotate the screen according to the user orientation). But when I transferred those to my PC, I realized that some needed to be rotated 90 degrees and some 180 or vertically flipped.

Ubuntu always has the answers to my questions. In a previous post in which I shared the commands on how to record screencasts in Ubuntu, I mentioned about avconv tool and how to install it with codecs. The same nice tool can be used to flip and rotate videos also.

To vertically flip a video:

avconv -i input_video.mov -c:v libx264 -c:a copy -vf "vflip" output_video.mov

To horizontally flip a video:

avconv -i input_video.mov -c:v libx264 -c:a copy -vf "hflip" output_video.mov

To rotate it 90 degree clock-wise:

avconv -i input_video.mov -c:v libx264 -c:a copy -vf "transpose=1" output_video.mov

The copy parameter means to keep the same audio encoding.

For further reading visit the official documentation: http://libav.org/libavfilter.html

Download Adobe CS2 Products for Free from the Official Website

Adobe Creative Suite 2

Adobe Creative Suite 2

Adobe CS2 line of products reached their end of life which also means Adobe is no longer interested in their Activation. So Adobe placed them on their website along with their Serial/Products keys without any strings attached. This news spread very fast that Adobe had to make a clarification about their intention. Whatever the case, the truth is they are available for download here.

Image editing using ImageMagick

To install the package:

sudo apt-get install imagemagick

To resize pictures:

convert source.jpg -scale 200x200 destination.jpg

Another option can be:

convert source.jpg -scale 200 destination.jpg

(This will scale the image to 200 width keeping the aspect ratio)

To know the file details, any of the following commands will work:

file source.jpg
identify source.jpg
identify -verbose source.jpg
convert source.jpg -print "Size: %wx%h" /dev/null

Recording Screencast in Ubuntu (Linux)

When I started looking for a Screencast recording solution for Linux, I wasn’t satisfied much with the available software. The best was recordmydesktop which always recorded in the open OGV (Part of OGG) format. There was little I could do. So I looked further and then I came across the powerful FFMpeg.

Using FFMpeg

It is a command-line tool with over whelming options. Until Ubuntu 11.10, I have used it with the following set of commands:

To install ffmpeag
sudo apt-get install libav-tools

Some additional packages required:

sudo apt-get install libavcodec-extra-53
sudo apt-get install mencoder
sudo apt-get install gstreamer0.10-ffmpeg gstreamer0.10-plugins-ugly
sudo apt-get install gstreamer0.10-plugins-bad
sudo apt-get install libx264-120
sudo apt-get install libx264-dev

Record quality AVI screencast:

ffmpeg -f alsa -ac 2 -i pulse -f x11grab -r 30 -s 1280x800 -i :0.0 -acodec libmp3lame -vcodec libx264 -vpre libx264-lossless_ultrafast -threads 0 out.avi

Trim video from the end:

mencoder -endpos 00:05:42 -oac copy -ovc copy html.avi -o html-whitespaces_en.avi

Remove the audio:

ffmpeg -i html-whitespaces_en.avi -vcodec copy -an html2.avi

Add a different audio:

ffmpeg -i html2.avi -i urdu.wav -vcodec copy -acodec libmp3lame html-whitespaces_ur.avi -newaudio

Using recordmydesktop

As mentioned earlier I wasn’t happy with its provided options but non-the-less it is a recording solution which supports command-line also.

sudo apt-get install recordmydesktop
recordmydesktop --width 1280 --height 800 --full-shots --fps 15 --channels 1 --device hw:0,0 --delay 10

If this gives an error, try hw:1,0 instead.

sudo apt-get install mencoder

To show a list of all the output formats supported:

mencoder -of help
mencoder -endpos 00:00:30 -oac mp3lame -ovc x264 out.ogv -o output5.avi
recordmydesktop --help

Using anconv

It is the replacement of FFmpeg and it should be considered now instead of FFmpeg.

sudo apt-get install ubuntu-restricted-extras mencoder
sleep 10 && avconv -f alsa -i pulse -f x11grab -r 30 -s 1280x800 -i :0.0 -vcodec libx264 -acodec libmp3lame myscreencast.avi

To get the info about the recorded clip:

avconv -i myscreencast.avi

To cut the video from the end:

mencoder -endpos 00:00:08 -oac copy -ovc copy myscreencast.avi -o myscreencast2.avi

where -endpos is the ending time, remaining will be removed.

Remove sound using mencoder:

mencoder -ovc copy -nosound myscreencast2.avi -o nosound.avi

Finally add a different audio to the nosound.avi

mencoder -ovc copy -audiofile sound.mp3 -oac mp3lame nosound.avi -o final.avi

instead of mp3lame the word copy can also be used.

Download Youtube videos using Ubuntu (Linux) command

There are numerous Addons and Extensions for Web Browsers to download and even convert the downloaded video to your desired format. However, if you are thinking of making a script or a program to download it without the browser, this post is what you need.

Run the following command to install the program:

sudo apt-get install youtube-dl

To download any video, open it in the browser, copy the URL and paste it in the following command:

youtube-dl -o [filename].flv [Copied URL]

If you didn’t provide any path with the filename, it will download it to your home directory.

Fixing Download Errors

In case you get the following error message:

ERROR: unable to download video

Try the following to fix it:

sudo -s
youtube-dl -U
youtube-dl -t [Copied URL]

Easy Image Optimization & Compression with JpegOptim in Linux (Ubuntu)

Image optimization or compression is a feature that is required frequently. A simple application available in Ubuntu is JpegOptim, but first it needs to be installed.

Installing JpegOptim

Run the following command:

sudo apt-get install jpegoptim

Compressing an Image to 75%

Run the command:

jpegoptim --max=75 flower.jpg

Here flower.jpg can be any file along with its absolute or relative path.

Compressing all images in a directory to 75%

This command will compress all the JPEG images in the current directory:

jpegoptim --max=75 *.jpg

Compressing all images and save them to a different directory

This command will compress all the JPEG images in the current directory and instead of overwriting them, save them in a different destination directory:

jpegoptim --max=75 *.jpg --dest=/home/images/

Display the Progress

Run the command with the additional -v switch:

jpegoptim --max=75 -v *.jpg

Display the Help

jpegoptim --help

Enjoy it!

Install ImageMagick on CentOS 5.5

ImageMagick is an open source image editing tool that can work on a huge variety of formats. It essentially is a command line tool with APIs for numerous programming languages including .NET, PHP, Java, Python etc.

Download the package:

wget http://www.imagemagick.org/download/linux/CentOS/x86_64/ImageMagick-6.7.0-10.x86_64.rpm

Install all the missing dependencies:

yum install libICE libtiff libSM libXext libXt libtool-ltdl fontconfig

Install the ImageMagick Package:

rpm -ivh ImageMagick-6.7.0-10.x86_64.rpm

And its installed!